How to Use the TIPS/CPI Database

This page will help you take advantage of the features of our TIPS/CPI database.
Scroll through the data
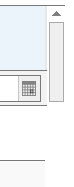
If the table is long enough that you have to scroll to see some of the rows, a wide scroll bar appears on the right side of the spreadsheet. It turns dark blue as you move it.
Sort the data
To sort:
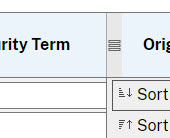
- Move the cursor into the label block of the column you want to sort.
An arrow appears and a menu of options opens. - Choose: Sort ascending, Sort descending, or Remove sort.
The spreadsheet changes based on your choice.
Page through the data
You can move between pages of the table by using the right and left arrow at the bottom of the table or by entering the page number in the block between the left and right arrows. You can also change the number of rows that display per page by selecting the arrow in the box next to "Show rows:" and select 100, 250, or 500. To the right of the "Show Rows:" box you can see what rows are available in the table out of the total number of records.
Filter by date or data range
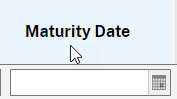
The columns for original auction date and maturity date have a calendar icon.
You must use the calendar icon to select a date or date range.
You can choose to see the calendar with all the
- days in a single month
- months in a single year
- years in a decade
The default is days in the current month. To move the calendar from month to month, use the left and right arrows.
To change to all the months in the current year, click once on the month name in the blue bar at the top of the calendar. You can then choose a specific month in that year or use the arrow keys to move the calendar a year at a time.
To change to all the years in a decade, click again in the blue bar at the top of the calendar. You can then choose a specific year in that decade.
To return from the decade view to the year view, click on any year. To return from the year view to any month, click on the month.
When the calendar shows the month in which you find the date you want or the date to start your date range, set the date or start the date range.
- Single date: Double click on the date.
- Date range: Single click on the first date of the range, then single click on the last date of the range. (If the last date of the range is in a different month, use the previous instructions to move to the month you want.)
- The calendar closes and the date or date range you choose appears in the box.
- The spreadsheet changes to the date or date range you chose.
To remove a selected date or date range:
- To return to today's date, at the bottom of the calendar, click Today.
- To clear the filter, at the bottom of the calendar, click Clear.
Exporting the data in four different ways

You may export the data to these file formats:
- CSV - Comma Separated Values
- JSON - JavaScript Object Notation
- TSV - Tab Separated Values
- XML - Extensible Markup Language
The buttons for these options are above the table.
Clicking on the ? icon next to each gives you the full name for that option.
To export the data:
- Select the button for the format you want to use.
A File Download box appears. - Choose whether to open or save.
You can use Save As to indicate where to put the file.
Note: If you choose CSV, data that is more than 15 digits long is truncated because Excel can't handle more than that.